 |
Standard Activity: An activity that occurs one time per day. This activity type allows for equipment and guide assignments. Ex. City Tour, Whale Watching Excursion, 3-day Hiking Trip |
 |
Custom Activity: An activity that occurs one time per day, in which a unique link is created. The activity cannot be booked online without access to the unique link. Ex. City Tour offered to Conference attendees. |
| The only difference between Standard and Custom activities is that Custom activities are not listed among your regularly scheduled tours in your online booking engine. To book online, a customer must have a direct link to the custom activity. |
Overview
Before learning how to set up a Standard/Custom activity, please make sure you have completed the following:
This article will cover the following topics:
- Where do I go to create a new activity?
- Activity Name/Date Information
- Internet Booking Configuration
- Activity Notes and Restrictions
- Pricing Information
- Taxation Information
- Capacity and Equipment Assignment
- Pickup/Dropoff Locations
- Activity Description
- Activity Specific Cancellation/Reservation Policy
Where do I go to create a new activity?
- From the navigation bar, select Activities > Activity List.
- Click on the Activity type you wish to create on the shortcuts panel (in this case, select Standard).
- You will be brought to your Basic Settings tab, which is where the majority of your configuration occurs.
Activity Name/Date Information
As soon as you have saved your new activity, the system will auto-generate a unique Activity ID which is useful for differentiating between similarly-named activities. The Activity ID will also need to be provided for OTA connections.
- Enter a Name for your activity.
- Select a Category Name (which should have previously been created).
- Enter the Activity Location (where does this activity take place).
- Insert an Image and Image Caption to display on your online booking engine. The Zaui online booking engine is image-heavy, so you want to ensure you upload high-resolution images.
- Set the Start Date and End Date.
| Image file size must be less than 781.25 KB, at least 765px x 430px and must be .jpg / .jpeg. |
If you are offering a Single-Day Tour and have different start times over different date ranges, click on the Add activity time range button to create additional date bands and time ranges. You can also customize which days of the week the activity is offered.
- Repeat these steps until all of the times are set for the duration that the activity will last.
- In the example below, the activity runs at 8:00 am from June 18-22, and at 7:00 am from June 23 to June 30.
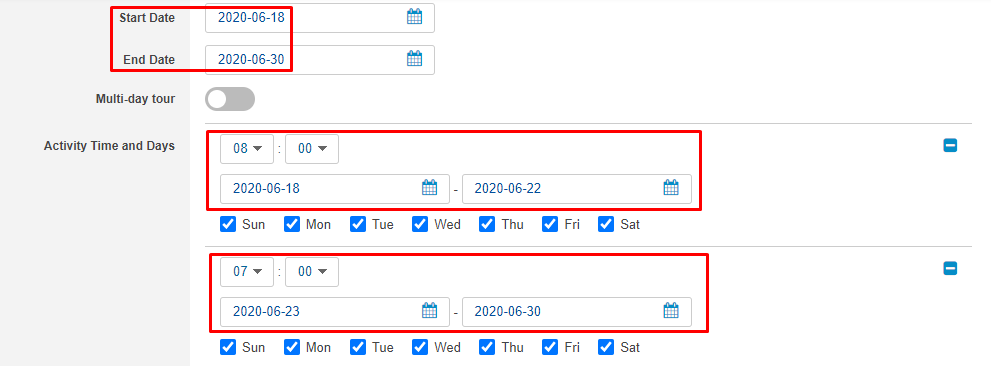
| Date ranges cannot overlap! Make sure your activity dates/times are set up properly and line up correctly. |
If you are offering a Multi-Day Tour,
- Check the Multi-Day Tour box.
- Set the Number of Days that the tour will last.
- Set the Start Day and Time and End Day and Time.
Internet Booking Configuration
Check the Publish to Internet? flag if you wish to allow this activity to be booked on your front-end website.
For the passenger types settings, you can customize which are enabled and redefine them if needed. If you leave the User Defined field blank, the system will use the default definitions.
Keep in mind that the customization you make here is specific to this activity. To customize your passenger types system-wide, check out this article.
The Advanced Settings tab allows further customization.
Activity online booking threshold time allows you to configure a minimum time limit (for example, if you put in 24, this means customers cannot book within 24 hours of the activity), as well as for a maximum time limit (for example, if you put in 72, the online booking engine will only show options until 72 hours into the future).
| Keep in mind the threshold times entered here are specific to this activity. If your threshold settings will be the same across all of your same-type activities, you can configure those system-wide under your Portal Settings. Check out this article for more information on setting system-wide thresholds. |
The Activity Web Sort Priority box allows you to organize the order in which each of your activities will display, both online and in Zaui Core (back office). A priority of 1 will put the activity at the top of the list. A value of 0 (default) does not consider priority and will place the activity below any prioritized tours.
Activity Notes and Restrictions
This section is where you can attach any Activity Notes/Restrictions that you have created.
To create Activity Notes/Restrictions,
- From the navigation bar, Select Settings > Online Booking > Notes & Restrictions.
- Click on Create Note/Restriction on the shortcuts panel.
- Note that the text field is limited to 100 character counts.
- Click on Save.
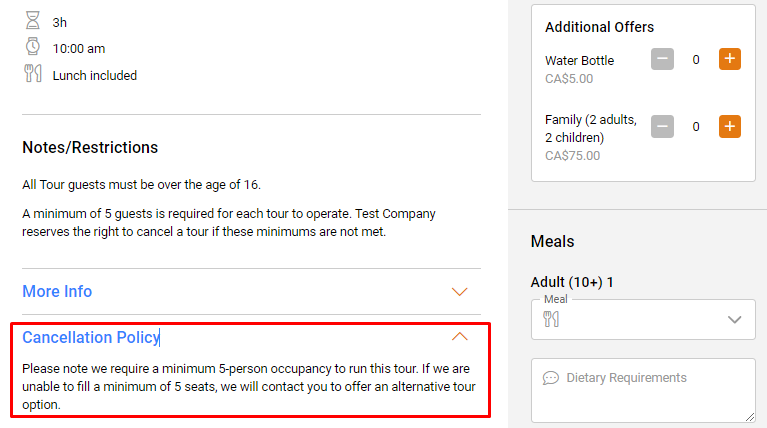
- These notes will be displayed on the activity and checkout pages of the online booking engine, as seen below.


Pricing Information
This section is where you will attach the price codes that you have previously created. Check out this article for information on how to create price codes. If you are offering different prices on different date ranges, you can attach more than one price code.
| If no price code is attached, your activity will display as $0.00 on your Online Booking Engine, so make sure to add it before going live! |
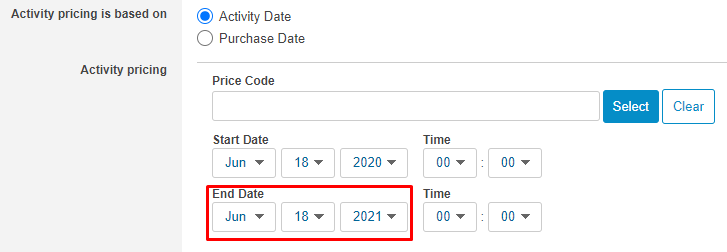
This section is also where you can add price codes that are either based on the Activity Date or the Purchase Date. For example, you would like to offer a cheaper price for bookings made from November 2020 to March 2021 for your April-June 2021 tours, and a regular price for bookings made during your operating season. For this example, make sure you base your activity price on the Purchase Date.

When entering the start and end date of your price code, ensure the end date is always past the end date of the activity (in Activity Name/Date Information section) to prevent any pricing errors.
Taxation Information
Only taxes that have been previously created will be listed in this section. Check out this article for information on how to create taxes/fees.
Enabling When booking this activity apply all per person per day charges will apply the tax per person, per day for Rental or Multi-Day activities. This flag needs to be enabled in conjunction with the Per Person Per Day taxes mentioned in this article.
Capacity and Equipment Assignment
This section is where you will attach equipment or set the capacity for your activity. Please check out this article for information on how to create and assign capacity/equipment to each different type of activity.
Pickup/Dropoff Locations
If your Standard or Custom activity offers pickup/dropoff services, this section is relevant to you.
You want to ensure you have your Zones created prior to continuing this setup.
- To allow customers to choose their pickup locations when booking online, check the Enable guests to select pickups for online bookings box.
- Click on Add Pickup Configuration.
- Set the Start and End Dates of when this pickup location will be available to choose from.
- Select the Pickup Zone previously created.
- Pickup Offset is used for an overnight trip where the dropoff might occur the next day.
- Pickup Start and End Time refers to the window of time within which the pickup will occur.
- Repeat steps 2-6 for all additional pickup zones offered.
- The Dropoff Assignment works the same way as the Pickup Assignment.
Activity Description
|
Setting |
Definition |
|---|---|
| Short Description Line 1 | This field will be part of your page title when customers view this activity on the online booking engine. The description here will be important for any search engine placement. |
| Primary Activity Description | This field is where you will want to provide your customers with details about your activity. This information will be displayed online before the customer purchases the activity as well as on the Zaui Core (back office) dashboard, by hovering or clicking on the I icon. |
| Additional Activity Information | This field will be visible to the customer on the online booking engine as well as on email confirmations. |
| Ticket Text | This field will only display on Point of Sale tickets. |
Activity Specific Cancellation/Reservation Policy
You learned where to add your overall company Terms and Policies under System Settings. This section is where you may wish to add activity-specific cancellation/reservation policies. For example, perhaps you would like customers to know before they purchase one of your tours that there is a 4 passenger minimum requirement to run this specific tour.
- On your activity set-up page, you will want to select the Additional Settings tab.
- Scroll down to Activity Specific Cancellation/Reservation Policy and enter the activity-specific policies here.
- Don't forget to click Save.
- You will now be able to see Cancellation Policies on the Online Booking Engine's specific Activity Booking page.